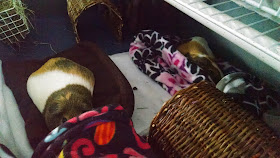
They really are like Buffy and Willow in matching twin beds in their dorm room.
When we go anywhere, such as the vet, I take both sacks with us. They tend to feel safer in the sacks, so it helps with the whole vet trauma.
Mama, we're not so sure about this whole vet thing. Can we go home yet? What do you mean we're waiting for nail trims?
So, on to actually making sacks.
Again, as with the tunnels, hit up the fabric remnant section of the fabric store. This pattern uses a 12" or so length of standard 58" fleece. I used batting for this sack, but you can also use Uhaul liner or a hand towel. You'll also need boning of some sort for the sack opening. I used these 36" cable ties again.
First, fold the fleece in half lengthwise so it's 12" (or whatever length you bought) by ~29", with the right sides facing each other.
Now, basically cut the largest sized rectangle you can with the fleece you have. You'll need two pieces of fleece and one piece of liner in this size.
The strange dancing pandas are face to face.
I like to pin two adjacent sides.
Face the WRONG side of the fleece with the liner, then fold in half with the RIGHT side of the fleece facing in. Pin.
Make sure you pin the same two sides you did above.
Sew along where you pinned. Make sure to leave a hole in the SINGLE FLEECE piece through which you can turn everything inside out.
Flip the fleece/liner piece right side out, then slide it into the still inside-out single fleece piece.
Pin along the edge and sew.
Pull everything right side out through that hole you remembered to leave in the single fleece layer.
Now, grab your cable ties or whatever you're using for boning. With cable ties, first cut off the head and pointy tail, then bend it so it'll fit through that handy hole you left, and push the whole thing right up against the seam between the fleece and fleece/liner pieces you just finished sewing.
Make sure the cable tie is flat between the layers.
Pin just below the cable tie.
I like to put the foot right up against the cable tie.
Finally, sew that hole closed. It doesn't have to be pretty.
Yay, a sack!!
One final step before handing this to your piggies. If you didn't already wash the fleece, time to do so now. New fleece comes with a protective barrier that prevents moisture from going through, so you want to break down that barrier. Fabric softener and dryer sheets help replenish the barrier, so do NOT use those. I've had good luck soaking for a few hours in hot water, then one or two hot water wash/dry cycles, but no guarantees.
Hopefully your piggies love sacks as much as mine do!! Mine like to nose around in their sacks, talking to themselves and making things exactly right for optimal comfort.
Willow demonstrates two methods of using sacks: in and on.
Buffy stays warm and cozy in her sack.


I never thought about using zip ties to help them stay open. Thank you for this tutorial!
ReplyDeleteHow big do you cut the rectangle pieces? Thanks
ReplyDeleteAgain, as with the tunnels, hit up the fabric remnant section of the fabric store. This pattern uses a 12" or so length of standard 58" fleece.
DeleteIt is best just to give dimensions of the fabric needed. People can use whatever fabric/technique they want to cut it. The way you posted this project made the directions more complicated/confusing than it needed to be.
DeleteI'm going to balance Jules' critical, unnecessary comment with a kind one: thank you for posting a brilliant, free-to-access pattern in your own valuable time. Much appreciated and still being used in 2021. Thumbs up!
DeleteAlso thank you for the zip tie idea!! It’s brilliant!! I have other things to no avail!! I m definitely going to try one again. Thank you so much !! So brilliant.
DeleteThank you for the zip tie idea! I could never get mine to stay open!
ReplyDeleteIt works that's what I use in mine. I use same concept just in different sizes(I have guinea pigs hampster rabbit cats and dogs) this works for all of them. Another idea as long as you keep the animals safe we use cotton balls at times for inside so that it's comfortable " pillows all sizes works for our dragons also for pillows " they are all spoiled
DeleteThought about using an embroidery hoop in the entrance...do you think this could work?
ReplyDeleteI'm not sure how washable an embroidery hoop would be.
ReplyDeleteIn a tutorial on corsets i learned that you can use strips cut from a milk/juice jug. You trim and staple them together to achieve desired length. Washable!
ReplyDeleteI also cut large yogurt containers and kids to make washable circular openings inside the sacks.
DeleteGood day! I simply wish to give an enormous thumbs up for the great information you could have here on this post. I will probably be coming again to your weblog for more soon. betfair online casino
ReplyDeleteThese are great! I made two guinea pouches for mine! I used 12x25” pieces and used a piece of super-thin, plastic “cutting board’ for the boning. I wish I could attach a pic to show you!
ReplyDeleteI use underwire from bras. You can buy them in Amazon or recycle them from old bras.
ReplyDeleteI love this idea, and the Guinea names. I have a Harris(for Xander) and Rosenberg, Rosie for short(for Willow)
ReplyDeleteOnce to add the cable tie do you do it up before adding it to the fabric or leave it open ,also does the cable tie not twist when washed ?
ReplyDelete